Monday, July 25, 2016

Summer Flavors

My friend whom I'm staying with for the summer bought a bag of lemons because they were a better value than buying just one or two lemons.  But she only needed one or two of them, so offered the rest to me.  I could have made lemonade, but there was also a pint of fresh picked blueberries from my parents' backyard sitting on the counter waiting to be eaten.  These two delicious summer treats were meant to be combined, so I went in search of a  recipe.  I had in mind that I wanted to make scones.  Scones are delicious!  Below is what I found and baked up.  Enjoy!

Lemon Blueberry Scones

Scone Ingredients
1/3 cup sugar
zest of two large lemons
2 cups all-purpose flour
1 tsp baking powder
1/4 tsp baking soda
1/2 tsp salt
1/2 cup unsalted butter, frozen
1/2 cup sour cream (I used plain Greek yogurt)
1 egg
1 cup fresh blueberries

Lemon Glaze
3 T unsalted butter, melted
1 cup confectioners' sugar
1/2 tsp vanilla extract
1-3 T freshly squeezed lemon juice


Instructions:

Preheat oven to 400 degrees and set oven rack to the middle position. Line a baking sheet with parchment paper, set aside.

In a medium-sized bowl, gently toss flour, baking powder, baking soda and salt.  Set aside.  In a separate small bowl, wisk sour cream and egg until completely smooth.  Set aside.

In a large bowl, stir sugar and lemon zest together until sugar is moistened and zest is evenly distributed.  Pour in flour mixture and toss to combine.  Grate frozen butter into mixture.  Using your hands, work in the butter until mixture resembles a coarse meal.  Gently stir in sour cream mixture until just about combined.  Very carefully stir in the blueberries, being careful not to squish them.  Do not over work the dough!  It may be very sticky, so have extra flour on hand.  Very gently press the dough against the sides of the bowl a few times and form a ball.  Again, the dough will be sticky but will come together as you form it.

Place dough on a lightly floured surface and lightly pat into an 8" circle and 3/4" thick.  Use a very sharp knife to cut into 8 triangles.  Transfer triangles onto prepared baking sheet, leaving at least 1" between each one.

Bake scones for 15-17 mins or until the tops begin to golden.  Don't take them out too early or they will be too soft (which is what happened to me).  Allow them to cool for 10 minutes on the pan before transferring onto a wire rack to finish cooling completely.  During this time, prepare glaze.  Stir together all ingredients until smooth.  Once scones have completely cooled, go ahead and drizzle the glaze on top with a spoon.

If you have left over glaze, save it and drizzle it over fresh blueberries for a sweet snack later in the day.

Tuesday, March 1, 2016

Mint + Chocolate = Tasty Treats

My baking theme for February was chocolate mint.  I didn't plan it that way, it just happened because I had two bags of baking morsels that needed to be used (way past the date on the bag) and they both were chocolate mint.  I must have bought them either with a coupon or when they were on sale, because I don't normally buy variety morsels.  So instead of using them in the typical chocolate chip cookie recipe, I went in search of something different.

The first bag was NESTLÉ® TOLL HOUSE® DELIGHTFULLS™ MINT FILLED MORSELS.  I was delighted when I found on VeryBestBaking.com by Nestle this recipe.  I had all the ingredients with the exception of the Nescafe Taster's Choice instant coffee granules, but I did have Starbuck's Via which I thought would be nearly an equal (if not better) substitute.  I was baking them for my church small group gathering that evening and ran out of time to make the coffee glaze (not to mention, I ran out of instant coffee).  But they turned out "delightfull" and my friends really enjoyed them.  Hope you will bake some for yourself!  Here is the recipe:

MOCHA BROWNIES WITH MINT FILLED DELIGHTFULLS™

INGREDIENTS
1 cup all-purpose flour
3/4 cup baking cocoa
1/2 teaspoon baking soda
3/4 cup (1 1/2 sticks) butter
1 1/2 cups granulated sugar
3 large eggs
2 tablespoons instant coffee granules, dissolved in 1 tablespoon hot water
1 teaspoon vanilla extract
1 1/2 cups (9-oz. pkg.) NESTLÉ® TOLL HOUSE® DelightFulls™ Mint Filled Morsels, divided
Coffee Glaze (optional - see recipe below)

INSTRUCTIONS
Preheat oven to 350° F. Line 13 x 9-inch baking pan with foil. Lightly grease.  Combine flour, cocoa and baking soda in small bowl.  Melt butter in large, microwave-safe bowl on HIGH (100%) power until melted. Stir in sugar. Add eggs, one at a time, beating well after each addition. Stir in coffee granule mixture and vanilla extract. Gradually stir in flour mixture. Fold in 1 cup DelightFulls morsels. Spread into prepared baking pan. Sprinkle remaining 1/2 cup DelightFulls morsels over batter.

Bake for 28 to 31 minutes or until wooden pick inserted near center comes out slightly sticky. Cool completely in pan on wire rack.

If desired, drizzle with Coffee Glaze. Allow to set slightly. Lift out by foil edges to cutting board. Carefully remove foil. Cut into bars. Store in airtight container.

For Coffee Glaze:
Dissolve 1/2 teaspoon instant coffee granules and 1 tablespoon hot water in small bowl. Stir in 1/2 cup powdered sugar and 1 1/2 teaspoons baking cocoa until smooth.

So, for the second tasty treat, I had a bag of NESTLÉ® TOLL HOUSE® DARK CHOCOLATE & MINT MORSELS (like I said, must have been a sale or had a coupon).  Really wanting to stay away from the usual cookie, I looked a bit online and then thought up how I wanted to use them.  Since they were so old that the cocoa butter had begun to appear on the chocolate morsels, they looked spotty and unappetizing.  I knew that they were still good to eat but would be best melted down so that the cocoa butter could mix back in.  I decided to melt almost the entire bag of morsels in the microwave (picking out a few of the mint morsels for decoration).  The best way to melt morsels in the microwave is in 20 second intervals - stirring well between intervals.

Mint Chocolate Brownie Bites
After having melted the morsels, I needed to put them in something.  What better treat to add a spark of chocolate mint to than brownie bites!  I usually almost always have a box of brownie mix in my pantry (never know when I'll be invited to a party and need to bring something).  So, I mixed up just a regular fudge brownie box mix and poured it up in a mini muffin pan (with cute brown and green liners).  Then I took a small spoonful of melted chocolate and added a dab to each brownie bite, swirling it in to the brownie mix with a toothpick each time.  Once they were baked I topped each bite with 1-2 mint morsels and let them cool.  They turned out well with the exception of a hollow spot in a few.  Once again, the mint chocolate combo is always a winner!

As a bonus, I'll share with you a new drink I created that goes along with this theme of mint chocolate.  Basically, I discovered that if I added 8oz of Pure Peppermint tea to one package of Hot Cocoa Mix I get a delicious hot minty chocolaty beverage!  I bought a box of Twinings Pure Peppermint tea Keurig K-cup pods at a local discount store and didn't really care for the tea that much by itself.  It's a very strong peppermint flavor and I'm use to peppermint tea having other herbs in it.  So when I thought of adding it to the hot chocolate it was the perfect blend!

Thanks for visiting my blog!  Hope you're enjoying your week and living life the way it's "mint" to be lived!

Wednesday, November 25, 2015

Friendsgiving

It's that wonderful time of the year when family and friends gather together and share one of the best meals!  It's been a very long time since I've been "home" for Thanksgiving.  Over the past 10-12 years I have spent Thanksgiving Day with a different group of friends each year.  This type of gathering has come to be known as Friendsgiving.  It's always a bit of a question as to where I will end up eating dinner, but I haven't been stuck at home by myself yet (a few years that was a real possibility).  Ahh...the life of a single girl living far from family!

This year I was invited to my first official "Friendsgiving" (the invite actually said "Friendsgiving," thus making it official).  It was hosted on a Sunday afternoon at a church friend's house southwest of the city.  By the time I RSVPed most of the dinner food was vouched for and so I was asked to bring dessert.  I didn't mind this at all, since sweet treats are my favorite!  I love to bake and so, I searched around for a tasty recipe.

I'm a bit of a hoarder when it comes to cake mixes.  Whenever I see them on sale, I buy at least 1, maybe 2.  You never know when you might need cupcakes or a cake to celebrate an occasion!  So, I'll admit it and you can judge me, but I rarely make a cake from scratch.  Why do something the hard way, when an easy short-cut is provided?

Cranberries are an excellent
flavor for the season.
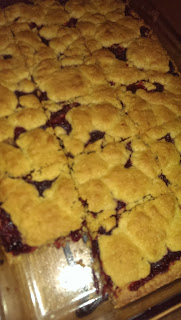
In addition to making great, hard-to-screw-up cakes, cake mixes can be made into a variety of desserts, thus the popular line of cookbooks by Anne Byrn.  I have the first book and have only made a few things from it, but one of my favorite treats are these Cranberry Oat Crumble Bars.  I just happened to have a bag of fresh cranberries in the freezer that I've been meaning to use for almost a year!

So, the night before the gathering, I baked these bars and my whole apartment smelled like cake!  Everyone enjoyed them at the gathering and I hope that you do to.

Happy Thanksgiving!

Cranberry Oat Crumble Bars


1 package (12 oz; 3 cups) whole cranberries (I used a bag of fresh cranberries that I had frozen)

1 cup granulated sugar

3/4 cup water (you can use orange juice)

1 package (18.25 oz) plain yellow cake mix

1 cup (2 sticks) butter, melted

1 cup old-fashioned oatmeal

1/2 cup packed light brown sugar

2 large eggs

1 teaspoon ground ginger

1. Place rack in the center of the oven and preheat to 350 degrees.  Set aside an ungreased 13 x 9 inch baking pan.

2. Pick over the cranberries, and discard any that are shriveled or discolored.  Place the remaining cranberries, granulated sugar and water in a medium-size heavy saucepan over medium heat.  Cook, stirring, until the mixture is thickened and all the cranberries pop, 10- 15 minutes.  Remove the pan from the heat, pour the cranberry filling into a shallow freezer-proof glass dish, and place it in the freezer to cool.

3. Place the cake mix, melted butter, oatmeal, brown sugar, eggs, and ginger in a large mixing bowl.  Blend with an electric mixer on low speed for 1 to 1 1/2 minutes.  Stop the machine and scrape down the sides of the bowl with a rubber spatula.  The mixture will be thick.  Reserve 1 1/2 cups for topping.  Transfer the remaining crust mixture to the pan.  Using your fingertips, press the mixture evenly over the bottom of the pan so that it reaches all sides.

4. Remove the chilled cranberry filling from the freezer and pour it over the crust, spreading it out with the rubber spatula.  Pinch off pieces of the reserved crust mixture and scatter them over the filling.  Place the pan in the oven.

5. Bake the cake until it is light brown and bubbling, 35 – 40 mins. Remove the pan from the oven and place it on a wire rack to cool.

6. Cut the cake into 24 bars.  Serve.

Thursday, September 3, 2015

Peach Cobbler Muffins with Oat Streusel Topping

One of my favorite fruits of the summer are peaches.  I don't know, maybe it's my Georgia roots, but there's just something about biting into a ripe, juicy peach that does my heart good. I love the sweet smell and even the fuzzy feel of the peel.  

Earlier this year I had some peaches that I knew would be too ripe to eat if I let them sit much longer, and I didn't have enough time to eat them all.  My default would have been to make a peach cobbler, but that's not the easiest thing to share with neighbors, so I searched around and found a nice recipe for an alternative.  I changed the topping from a regular streusel to an oat streusel and love what these turned out to be.


Peach Cobbler Muffins with Oat Streusel

Ingredients
2 cups all purpose flour 
1 1/2 teaspoons baking powder
1 teaspoon ground cinnamon
1/2 teaspoon salt
1/2 cup (1 stick) unsalted butter, softened
1 cup sugar
2 large eggs
2 teaspoons vanilla extract
1/2 cup whole milk
2 cups fresh peaches, diced (about 2 large peaches)


Oat Streusel Topping


1 1/4 cups old fashioned oats
1 tablespoon flour
1/3 cup brown sugar
1/2 teaspoon ground cinnamon
4 tablespoons cold butter, cut into chunks


Directions

Streusel Topping
In a small bowl, whisk together oats, flour, sugar and cinnamon.  Add in butter and mix together until full incorporated and you have a sandy texture.
Muffins
Preheat oven to 350º. Lightly grease a muffin tin with cooking spray or vegetable oil, or line with paper muffin liners.
In a small bowl, whisk together flour, baking powder and salt and set aside.
In a large bowl, beat butter and sugar until light and fluffy. Beat in eggs, vanilla and milk. Add flour mixture and stir until just combined. Gently stir in peaches.
Fill muffin cups 2/3 full with muffin batter. (Don't over fill.) Sprinkle muffins with topping.
Bake at 350º for 20 to 25 min, until a tester inserted into the center comes out clean.
When muffins are done, cool for a few minutes in the muffin pan before removing to cool on a wire rack.  Enjoy!

Tuesday, March 10, 2015

What's in the Name?

It took some time thinking up a name for this blog.  I finally chose something that I feel is rather appropriate - both the title of the blog and the web address have great meaning.
Saranac Lake, NY

First off, my name is Sarah.  Hi, how are you doing?  Nice to meet you.  Second, I like the word serendipity.  I like it's meaning.  I don't believe too much in random circumstances, however, I do enjoy the idea that God likes to surprise us with good surprises.  He delights, for His glory, to give His children good things especially when we aren't looking for them.  There have been many times in my life where there is evidence of God's goodness and love for me.  Thus the title: Sarahdipity.

That's creative! Now how does the website address relate?  Well, if serendipity is finding something good and this web address is "bake something good" what do you guess this blog will be about?  You guessed it - here is where I will be sharing all my favorite baked goods!  Now, I will not pretend that I am an expert baker.  Here is where the title takes on it's full meaning.  Most of the time that I bake something, it turns out good somewhat unexpectedly.  I don't come up with my own recipes and very rarely do I deviate from the exact measurements of a recipe.  So, I take no credit for the ideas.  It's more the implementation of the ideas that I find great joy and satisfaction in, and I hope you do as well!

So come on back each week and see what I've baked.  May you be inspired to bake something good (even if it's unexpected) yourself!